Publish with Profit. Transform your Words into
Create a blog and newsletter to reach a global market and maximize your profits with ghost
Google Search Console is the only means of communication between site owners and Google, a tool that 100% of new bloggers must know how to use.
Due to constant updates (online guidelines are often outdated) and Google Search Console itself is not easy to understand, it will create quite a challenge for newbies.
I will show you the most standard way to use Google Search Console with Ghost in 4 easy steps, you can gently master this tool.
1. Add your site to Google Search Console
Since Google Search Console has updated changes that are both dynamic and secure, now the standard and recommended way to use from Google is to add both and .Domain property URL property
Since Google Search Console has updated changes that are both dynamic and secure, now the standard and recommended way to use from Google is to add both and . Domain property URL property

Always add the Domain Property first because after completing the Domain Property verification, the Property URL will also automatically validate, saving time validating around.
- Add a domain property and verify the domain owner.
- Add property URLs (auto-authenticate owners).
Domain Property will help Google understand the entire root domain and related subdomains, thereby supporting overall SEO.
Domain properties should always be added to Google Search Console.
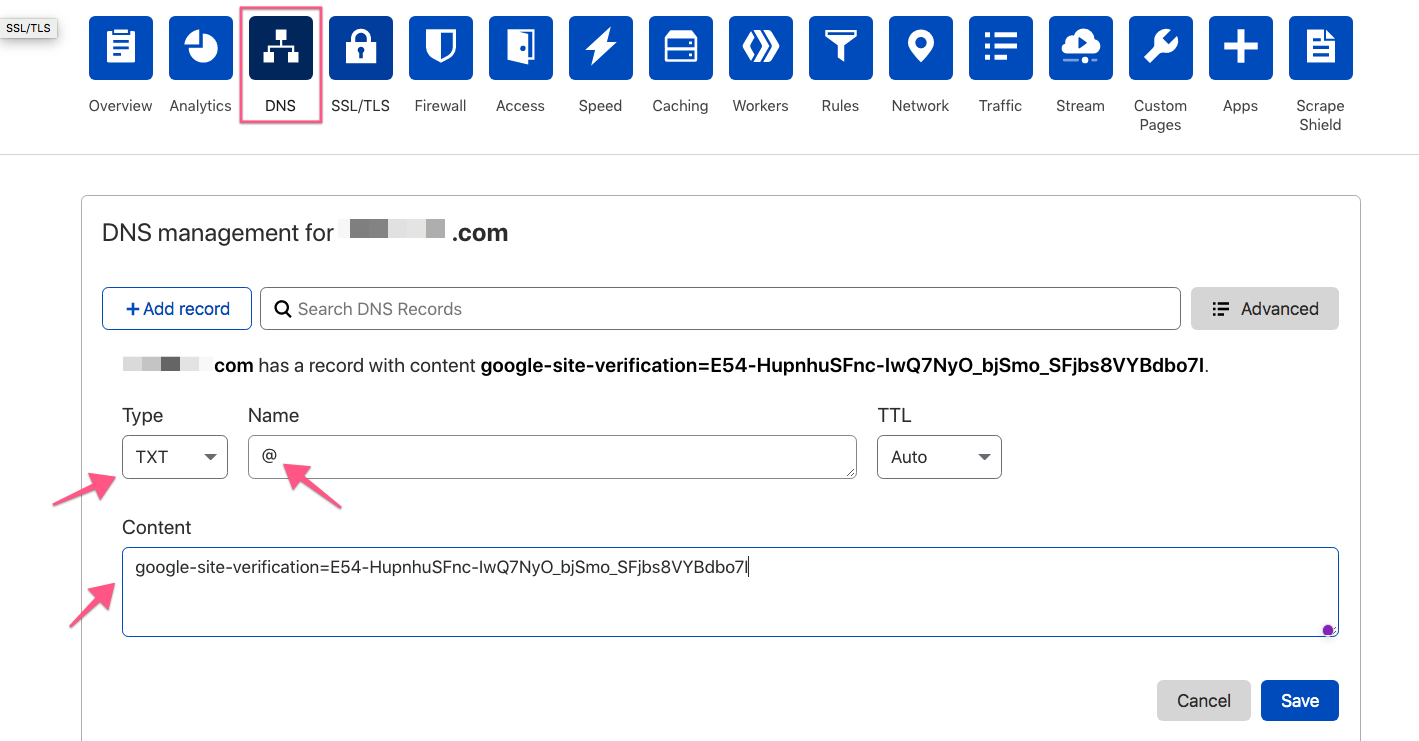
Verifying the domain property owner is extremely simple. You just need to add 1 TXT record with the code Google provides in DNS management (Cloudflare, Namecheap, Namesilo,...).


Then click Validate in Google Search Console to complete (need an update time for DNS records of a few minutes if Cloudflare, a few hours if other domain name providers).
2. Submit your website's sitemap to Google Search Console
Not all websites have the ability to generate sitemaps automatically. WordPress recently added the ability to create automated sitemaps to the core. Ghost has already created sitemaps for you by default from the first versions.
Blogs are essentially creating a lot of content, so sitemaps are essential because they will help Google quickly index your newly published articles and orphaned pages on your site (pages that don't have any links from all of your posts).
The default ghost automatically generates a sitemap for you with the following URL:
https://yourdomain.com/sitemap.xmlYou just need to add the sitemap at the property URL, the domain property will be automatically added. You don't add any sitemaps in your Domain Property.

3. Set up automatic sitemap ping every time you publish a new article
Ping your sitemap will help Google index your newly published article faster, just like you tell Google "I've published a new article, please index it."
Pinging sitemaps is extremely simple on Ghost (complicated with other platforms) because Ghost has very good webhooks.
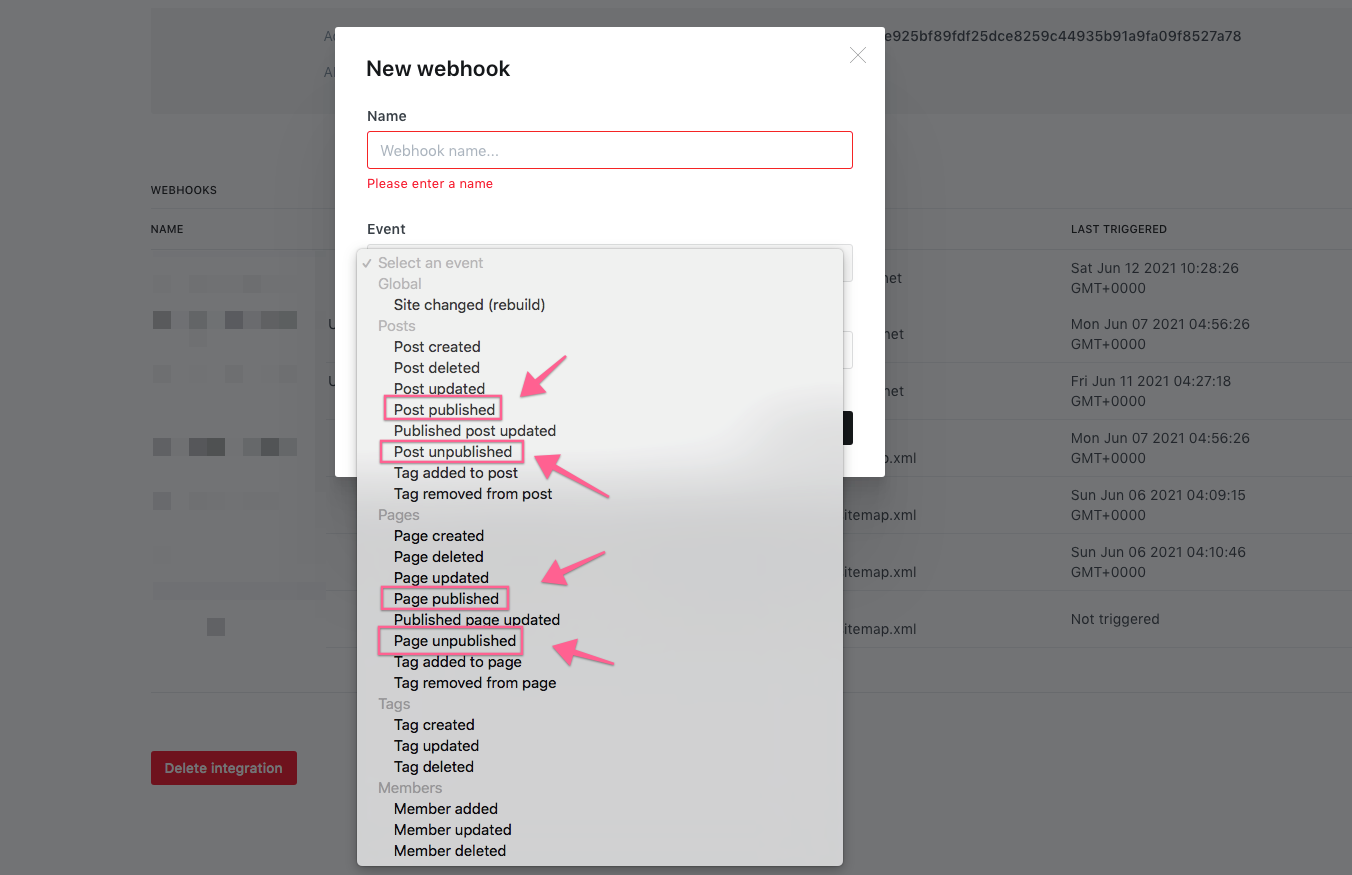
You will create a custom integration (or use an existing custom integration, no new one required).
Choose 4 important events
Post publishedPage publishedPost unpublishedPage unpublished

Add the webhook URL for each event as follows:
http://www.google.com/ping?sitemap=https://yourdomain.com/sitemap.xml

Note, do not choose the wrong event trigger, pay careful attention.
Final Thoughts...
If you use Ghost's AMP, Google Search Console will add an AMP tab in the Enhancements tab.
However, posts for members will cause AMP errors, of course. If you see an AMP error in your member posts, ignore it. No problem (member-only pages won't have AMP).
Good luck!


Cuong is passionate about digital publishing, specializing in leveraging the power of platforms like Ghost and WordPress, while sharing effective practical SEO writing techniques based on these tools.
ghostfam.com


Comments